How to Connect Epson Printer to Mac
If you want to take a print from your Mac computer. Then, It is very important for you to connect your Epson printer & Mac with each other. But before that, you will have to set up the Epson printer on your Mac by downloading its Setup utility & Drivers from the Epson website’s support page.
Epson Printer Setup utility lets your Epson printer to print emails, documents, or images from any computer which has an e-mail function. You can use your smartphone, tablet, or computer to print images, documents on your printer from anywhere. Let’s see how you can connect your Epson printer to MAC.
 First of all, you need to visit the Epson printer’s official website to download the Epson Connect Printer Setup Utility.
- Once you have successfully downloaded the utility, double click on it.
- Now, press down the “Continue” option.
- Once you click on the continue button, Software License Agreement Window will appear next.
- To agree with the Software License agreement, press the “proceed” button after tapping on the “I accept” checkbox.
- Now, Press down the “Install” button and close it.
- Now, find the Epson printer, select it, and press next.
- Open the Finder window if its window does not open automatically.
- Now Choose the “Program & EPSON” Apps option.
- Double-click the Epson Connect Printer Setup button now.
- Continue to select the “Printer Registration” option and click on the “Next” button.
- Select the okay button when your Mac computer displays you “Register a printer to Epson Connect” option.
- Now, press the “I accept the terms and conditions” option for continuing with the Epson connect Printer Setup.
Next, follow the instructions mentioned below:
- If you don’t have any Epson connect account, Then create one by filling in the Create “Epson Connect Account” form.
- If you have any existing Epson connect account. Then, you can simply add your newly bought Epson printer to it by signing in with its username & password.
Also Read: Epson Printer Communication Error
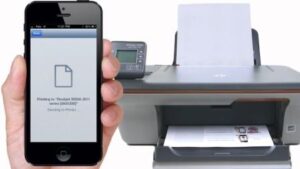
How to connect Epson printer to iPhone
Firstly, You need to have an iPhone having the iPrint app installed on it. Secondly, Your Epson printer must be compatible with AirPrint technology & should have the latest firmware. Third, Both your iPhone & Epson printer should be connected to the same wifi internet network for using the AirPrint. Once you have it all. Then you can proceed further to connect the Epson printer to the iPhone.
 Launch the Epson iPrint app on your iPhone.
- Now, you will see a screen telling you “Printer is not selected” & asking you to select your Epson printer.
- Tap on the ” Tap to select your printer” option.
- Now, you will have to look for your printer in the “local” tab & tap on its name.
- If your printer is not showing in the list of all available printers, then, search for it by tapping on the “search” button at the bottom of the “Local” tab.
- If it still doesn’t appear, Then, you can connect the Epson printer manually to your iPhone by tapping on the “Direct wifi setup” option under the “Manual IP” tab.
- In the end, tap on the “Add” option you see at the bottom of that window.
- Hence, you have connected your iPhone & Epson printer with each other & now you can easily print from your iPhone.
Also Read: Epson printer Error state
These simple steps will help you in connecting both your Mac computer & iPhone device to your Epson printer. The Epson Printer Setup is now finished. If your Epson printer not printing even after that & facing configuration issues, Then, feel free to meet Epson’s tech-savvy professionals anytime, anywhere at your convenience.
The article you may also Read: Epson Printer offline